Sunday, 30 December 2012

Anti fingerprints...

This update got nothing to do with my build progress, its just something that I picked up while buying something at watson. I bought some latex gloves to wear when working with my build. The only reason is to keep fingerprints out of the way as I am quite lazy to clean all those shiny fittings etc from fingerprints.

Price was quite cheap also just that the size is a bit small but they only had size S in stock. Hopefully I dont get very uncomfortable while using it.


I believe 500ml is not enough, 1 litter should be enough to fill my reservoir...

Wednesday, 26 December 2012

[Incomplete] Strip down those cables naked!!!

I bought some cable sleevings from a local modder in my country, topazzatale aka najib but I just found out he pass away last year. Really sad news for all of us considering the amount of work he put in for local modders in my country. I wish he was here today to view my build progress...

I was very impressed with the 'colortrail sleeving' quality, yes it may not be mdpc type of quality but I would say its pretty good considering the price is almost half of mdpc. All that mattes to me is as long as it can cover those cables & looks good I dont mind. Its not like there will be any performance difference, its just for looks. So I got red & black sleevings as you can see since I was going for the ROG theme.

<Insert sleeving pictures>

Sleevings is here but I do not have the tools! I wanted to buy lamptron modding tool kit but all the sellers over here ran out of stock. There are other alternatives but I heard bad reviews from it so I will wait for them to restock the tool kit. I tried using stapler bullets but the trick doesn't work. My fingers hurts like hell, stapler bullets is just too soft & small to remove the atx cable pins. I do not have the bigger & thicker size bullets for those thicker papers so I tried with needles too & failed. After searching around for suitable stuff at home I finally found my sister hair clip. Size seems perfect so I stole it *evil laugh*.

Its a little too big & thick, but it would be a prefect tool if it could just fit it into the holes. So what I did was went downstairs & borrow my dads power drill without his permission *evil laugh*. Insert the grinding drill bit & started grinding the hair clip. After 1 hour I manage to grind it to the perfect size that I need, yeah it took me quite long because I need to grind it slowly bits by bits to ensure I didnt over grind it otherwise the metal material will be too thin & break easily.

<Insert sleeving pictures>

It works like a charm! Success...awww yeah...

Continue sleeving the rest of the cables until I came to molex cables. Oh crap, I just cant find any thing in the house to make a diy tool for this cable. Too bad, sleeving progress got to put on hold for now. Same goes with the 3pin fan cables as well. Another problem I encounter is with my gpu cables, if you notice there is a capacitor at each cable & I am still deciding to just cut it or separate the sleeving & leave the caps naked. According to my others, cutting it have no effect to the gpu which is good news but I am sure the caps are there for a reason. otherwise why would silverstone put it there in the first place & waste resources? My guess is to ensure clean current to the gpu but I could be wrong.

So my other option is just to get a cable extender & sleeve that instead because I dont plan to change my psu anytime soon. We will see how it goes. Apologize for the crappy picture quality, I took this pictures when I flashed my phone to ICS and it was a beta ROM so there wasnt any camera drivers for it at that time. I have re-took some of the pictures again for you guys. My digital camera was MIA as well during that time...

Drain valve arrived!...

I decided to order drain valve & T-block fitting online from performancepcs. The shipping from US to asia wasn't cheap via FedEx but its still cheaper than the price quoted locally. Nothing major to update you guys its just a drain valve and a bitspower T fitting.

I am not so sure how the loop is going to be in the system yet but I got a feeling I will need a T fitting so I bought 1 in case. I have yet to get some 90 degrees fittings and some male to male adapter from bitspower as well as a fill port but those items got to wait due to insufficient funds :P

For now just enjoy some pictures:


Random shot lol:

Sorry didnt take much pictures on the valve or T-fittings. Will take more once I started assembling it.


Rojak + cendol = heaven...


Place for bubbles to rest....

So I bought a reservoir today (not according to this post date as I didnt start this blog earlier, got it few weeks ago). I bought the bitspower z-multi tank 250 reservoir at such a cheap price. Its a used unit as well but just minor scratch to it.

The previous owner didnt use any dyes, not that I am aware of so I cant see any stains on it. Looks almost as new with just some normal wear & tear. The reservoir is a little big than I expected & I am pretty sure with the build that I am going for its going to be a little tight in the corsair 650D but what the heck, if people can water cool a bitfinex prodigy then I believe watercooling a corsair 650D wont be that hard. When there is a will, there is a way....

Anyways back to topic, from what I observed the reservoir quality is superb but I dont really get why is there a aqua tube in it? From what I read some say its to push bubbles out to the reservoir. I am not sure how it will work without testing it & doing a leak test but I will leave it later once I got all the other components. Another thing that is bugging me is the anti cyclone fitting, that seems like the output of the reservoir (intake to pump) but there is 3 small holes to it, I feel this could put more restriction to the pump. I think removing it should be fine but as I said need to do a practical test to figure things out.

Maybe its to mount it on top so that water will hit to the sides of the reservoir instead of directly on the water? It will look cool for sure but its a big problem for me to fill & bleed the reservoir unless I flip the caps upside down. It seems like they allow us to go with any configuration we want so I will test & see which is best for my setup :D

here some shots for you to enjoy:


Nom nom nom....what is more delicious than chocolates from poland?


Tuesday, 25 December 2012

Moarr fittingsss!!....

This will be a quick update, so today I bought some bitspower fittings from a lowyat.net member. Some were used and a few was brand new still sealed in the packet. Since it was fittings (metal with coating) I guess buying used units wont affect my build compared to new units.

The moment I got the fittings I fell in love with bitspower already. The build quality is excellent. I like the bitspower logo & the fine print "bp" word in it. Some of the used fittings got a little stain marks / I think its more like the silver coating came out a little inside, so could see a little brass inside. It not affecting the outter appearance which is the most important part so isn't a big deal for me. What can I expect from used units anyways? :(

But after a while I been thinking perhaps getting the matte colour would be better with my ASUS ROG colour scheme? Maybe I just need to get all the components first & fix it. If it doesn't match I will probably sell it & get matte colour then. We will see how it goes as for now enjoy a few pictures of the fittings! I will be using a clear tubing with dyes so compression fittings is the way to go. In case if the colour scheme isn't what I am looking for then I might consider getting a coloured tubing & some monsoon fittings instead.


PS: It cost me a bomb just for fittings, 1 fitting cost like ~RM30 over here & even more for rotary. Considering the amount of fittings I bought...you do the math! But since its a used units I got slightly cheaper hehe, but not that much though...still burned a hole in my pocket :'( But its ok, at least its completely safe for noobs compare to using barbs. Better be safe than sorry, if I used barbs any thing started to leak I will probably regret. Nobody said watercooling was a cheap hobby anyways...just got to deal with it....

My favourite fruit, DURIAN!!

Current build status...

Below pictures is my current rig and also the workplace. As you can see I added a another monitor next to it, actually that is my old monitor from my pentium 4 desktop. Since it was lying around I might as well hook it up right? Resolution isn't the same so its not exactly a perfect dual monitor but it will do for now.

The problem that I am facing now is the limited space at my desk. I just cant fit everything on the table. I could put it on the floor but what's the point of a windowed side panel if I were to do that? Perhaps getting a prodigy is a solution but I prefer full tower / mid tower casing. Maybe in the future I can build a desk pc & downgrade the casing to a prodigy or any smaller casing & put it on my other table.

Luckly I found some extra wood so I am planning to extend my table. Take a look at pic #2, the monitor is sitting on a piece of wood. I am thinking of extending it a little bit more to the left & screw it to the table so that it doesn't accidentally fall over. Yes it may look ugly but its not like I have an option over here right?

Otherwise I just need to buy a custom made table and probably sell this table off. I do not want to go with this option yet because I am planning to make a custom desk pc once this rig is completed but that is just my future planned projects. Something like this --> http://forum.lowyat.net/topic/2595875. Probably in another 2-3 years time. Please ignore the kisses chocolates & the screw driver supporting the gpu. Actually there is no need for the screwdriver but I dont really like to see small flex, its just a temporary fix, will remove it once I watercool it.


How is my cable sleeving? Nice or not? It's not done yet though, waiting for molex pin remover. My casing isn't water cooling friendly. I don't want to mount radiators outside the casing so my only option is to get a new casing. Below are the stuff that I already bought & what I haven't.

Items needed:
1) Corsair 650D
2) Lamptron Modding tool kit
3) XSPC Raystorm (intel)
4) XSPC EX240 / Alphacool Nexxxos XT45
5) Either mcp35X + heatsink or mcp655 pwm. / D5 pwm version
6) Some 7/16 5/8 tubing's
7) Arctic Cooling MX-4 / Tuniq TX-4
8) MAYBE some matte bitspower compression fittings + 45 & 95 degree rotary
9) Some male to male g1/4 thread fittings
10) Mayhems dyes, biocide & kill coil.
11) Corsair SP120 High performance
12) Some acrylic panels for luminous panel mod
13) NZXT Hue
14) Sata cable sleevings
15) Havent decide on the GTX670 waterblock yet hehe
16) Phobya 200mm radiator / XSPC RX 240
17) Fill port


Items that I possessed:
1) Bitspower z-Multi Tank 250
2) Bitspower silver shiny compression fittings & rotary (not sure want to use this or go with matte fittings yet. Because colour scheme will be ASUS ROG so silver shiny might not match as well as matte colour).
3) Colourtrail sleevings - red & black


I might try asking for sponsors out there but I doubt anyone will sponsor me as I do not have a previous build log for them to see but I will just give it a shot. Who knows, maybe with some progress some might consider? Its going to be a slow build anyways without sponsors but I dont mind as I am doing it for fun with my personal rig.


Oh and ignore the motherboard, I will get a ASUS ROG motherboard once I upgrade to haswell, currently using a cheap motherboard lol. I apologize also for my picture quality, I do not own a DSLR so cant capture high quality pictures like some modders out there but I will do my best to try out with different lighting's to get quality pictures if possible.Unless someone want to sponsor me a dslr camera hahaha...

Inspirations

Before I start my worklog on my upcoming watercooling build I would like to thank all the people that are involved in helping me with my doubts & giving me advice since I was a total noob hehehe...

Big thanks to Overclock.net, the members in the water cooling forum is probably the most helpful people that I ever meet online. Special thanks to Martin & Skinnee Labs for all the unbiased testing data that they put out online for people like us. Without their data, making decision would be extremely hard for me & I will probably end up opening so many threads asking questions around instead of reading.

Thanks to Martin & Bundymania for their reviews on radiators, helped me a lot on choosing the right radiator. Biggest inspiration on why I want to watercool is probably form everybody awesome build that I saw in the Water Cooling Gallery in OCN & XtremeSystems. Really motivated me since its so aesthetically pleasing. Thanks to Million Dollar Pc too, the gallery in there is like porn hahaha...

Thanks to Irie too, gave me some inspiration on the luminous panel and the only reason why I started blogging my worklog is because of his blog hehe. Since my build log progress is going to take quite some time due to limited amount of money I have to buy parts I didn't want to open a worklog thread yet otherwise people might be waiting forever. Once there is significant progress then only I will open a worklog thread in lowyat.net, OCN, XtremeSystems etc... but in the meantime I need some place to keep track & record my progress thus crazymofoModz blog appeared. Its also due to the fact that I am quite busy with work so updating to 1 site is easier for me, once I got the time I will copy everything to those forums. Putting all my stuff in my personal blog gives me an advantage because only I have control on my stuff, with the recent events that happened at OCN, if mods were to delete my thread at least all my hard work doesn't go off like that.

Thanks to the members in forum.lowyat.net too, without them getting watercooling parts would be my biggest challenge. By the way I am planning to do something like the build CED-G60 did but with a ROG theme instead & cleaner cable management. Just to give you guys a rough idea on what I am planning to do and maybe I will add another 240mm / 200mm radiator to the front to give more cooling capability to both the cpu & gpu. We will see how it goes...


Monday, 24 December 2012

[Incomplete, will update soon] A gamer upgrade...

You all probably knows the graphic card is the heart of a gamer and mine was getting old. Still handles all the new games at medium settings pretty well but I wanted an upgrade and since Nvidia 6 series was out I decided to sell my current card to get the new one. The new series card was more power efficient and obviously more powerful than the previous gen cards.

I bought ASUS GTX 670 (non TOP version), yes its an asus brand because once you go asus you never go back. Reason why I went for asus is its colour scheme, quality & the card comes with a freaking backplate man! No more fulgy pcb board, card looks like a premium graphic card. Performance of the card was just too good, after overclocking it the card is on par with a GTX 680. Isn't that crazy? But then I overclocked the card otherwise it wont be able to beat a GTX 680. The TOP version might be able to overclock better but it was sold out few days after it was released. All the sellers do not have the TOP version so I end up getting the normal version & saved couple bucks.

Here are some pictures for your viewing pleasure:


<INSERT ASUS graphic card pictures>


Here are some of benchmark for you to compare:
<Insert benchmark data>

The journey begins....

Before I start my build log, I would like to apologize for my bad english, english wasn't my mother tongue and I never paid attention in class when I was a kid. 

So let me give you guys a brief info about my rig. All this started way back when I was a student (I am still a student) which was like 2 years ago? Never had a gaming rig, just a regular desktop that handles games at medium settings and a laptop that can handle games pretty well. As time goes on, games got more demanding thus a need for an upgrade...

Decided to build a desktop for my own, and yes I started from scratch with guides from youtube but I was quite tech savy so building a rig was pretty simple to me. Until today I haven't come up a name for my build yet but these were the specs:

Intel i5 2400 (mistake, should have bought the 2500K)
MSI H67MA-E35
Silverstone strider plus 600w
1TB Samsung hdd
Liteon dvd drive
Cooler master haf 912
DELL 23" IPS Monitor
Logitech g510 (useless shitty keyboard)
Logitech g35
Razer lachesis + goliathus (both of these items are more than 4 years old already! dafuq man...)

Apologize once again because I started writing this build log 2 years after my rig was completed, so at that time I didn't thought of taking much pictures as I didn't plan to write a worklog. Below are the pictures of all the boxes that I am still keeping. But worry not, I will retake almost all of the pictures again once I got my new casing as I will be disassembling all the components at that time.


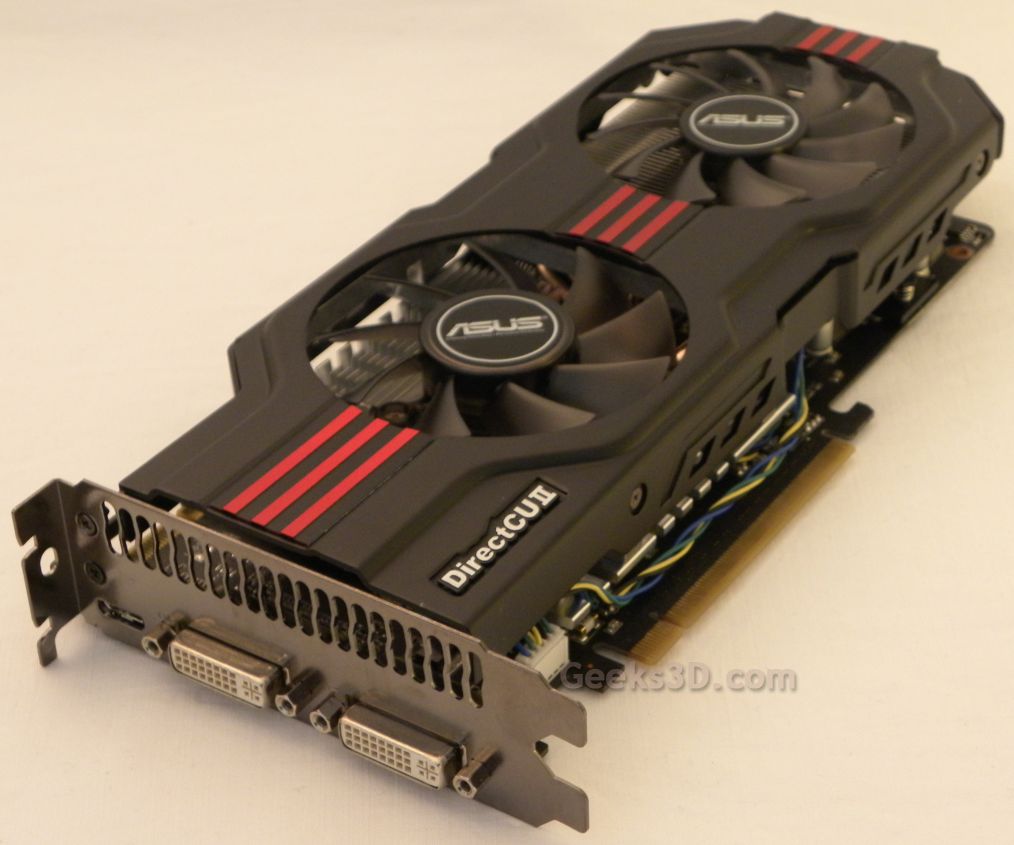
All those stuff came out from my own pocket so was pretty much broke, which is also why you couldn't see any graphic card. As time goes by I finally got a ASUS GTX560TI and was very happy with it's performance at that time. Matter of fact, the card quality was superb man and fell in love with ASUS ROG theme. I do not own that card anymore so I can't take any pictures of it but here a picture taken from google search (credits goes to www.geeks3d.com ):


Then I bought Edifier C3 speakers, ever since I got it I never touched my Logitech G35 for quite some time already. The bass that sub woffer produces is just too awesome, can't imagine what it will sound like with a soundcard. (sorry a bit dusty, just took the picture recently. Didnt take pictures when I bought it brand new). Maybe in the future I might consider getting a asus xonar essence soundcard and probably upgrade my speakers to a more higher end ones.


Then as time goes on I sold my shitty keyboard and got myself a mechanical keyboard. Steelseries 6gv2...never type as comfortable as this before.


This is what I use for games that is more suitable with a controller such as assassin creed. If you ask for my recommendation I would suggest you to get the xbox 360 (pc version) controller instead. Nothing wrong with my controller, just that all most all the games have support for the xbox 360 controller rather than this controller. This means for some games, you need to map the keys manually the first time you start playing it.


As time goes by, I made few improvements to my rig such as adding CCFL Lighting, side panel fan + dust filer, wireless card, 15m lan cables etc..nothing major. I was in fact saving money for a new laptop lol.